MAKE A TELEPORT TRANSPONDER
At first sight this unit might appear to be a rogue teleport transponder of suspect origins since it has eight tuned circuit molecular transmitters as opposed to the four on most commercial units. This basically means that it can transmit matter particles on all four of the main approved phase bands, but can also utilise the two military bands and the two research bands. Although it's possible to use codez to phreak the civilian matter bands and get free teleportation facilities, it is riskier to do this with the military frequencies although the rewards are higher in terms of global access due to the lack of zoning restrictions on the military materialisation satellites. Use of the research bands is best restricted to personal teleportation experimentation, since other equipment using the same bands will often be experimental too and may cause molecular beam collision or dephasing which is very unpredictable.On closer scrutiny this unit might actually appear to be a cheap prop made as filler for a low budget sci-fi show. It would in fact appear to be a little circuit board with a flishy flashy flip flop circuit jiggling a bunch of LED's about with some tacky fake inductors for looks. All this in a clear plastic playing cards case... cool.
In fact they looked so cool on the show that all the originals were adopted by the crew.

This is a slightly adjusted version of the original design which was slapped together in a hurry to meet a deadline. This newer version has improved component spacing to take advantage of other cases, and in this case it utilises high output yellow LED's instead of the red LED's used on the original.
The power source is two AAA batteries either primary or rechargable. In this case two NiMh rechargables have been used with their plastic sleeve carefully slit off with a Stanley knife to make them look like two fuel cells. Be aware that removing the outer sleeve of the battery makes it much more vulnerable to accidental shorting, since the case is generally the cathode (-ve) terminal. This is particularly important where two batteries might be in close proximity like in some battery chargers or holders. This design uses two separate battery holders to ensure that they are kept apart. (there's nothing stopping you from re-sleeving them in clear heatshrink though.
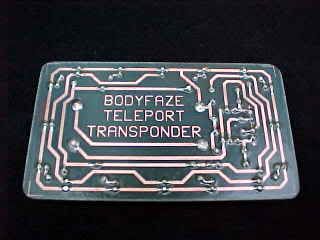
Since the original circuit was designed to be housed in a standard two part clear playing cards case it was decided to make the track side interesting too as you can see. The design uses the self-etch-friendly Chunky Trax approach and layout and assembly are designed for simplicity.
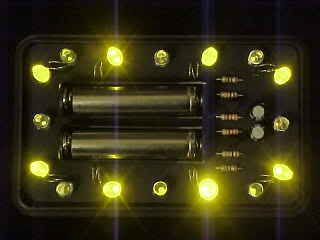
When operating, the LED's flash alternately at a high enough speed to give an intense shimmering effect.
You can use any LED's you want, but high output 5mm LED's are the best. Also note that the 2-cell power supply means that the circuit is only suitable for driving standard red, green, yellow or orange LED's since the voltage is too low to illuminate blue, white or GaN green LED's.
All the LED anodes face the outside of the PCB and are commoned onto one positive track. The two groups of LED's are wired in parallel and each is fed via a single current limiting resistor which means that all the LED's of a particular group must be of the same type to ensure relatively equal current sharing.
When mounting the LED's observe the little anvil shaped chip holder inside the LED's resin case. Whether it be the anode or cathode it is better to solder the other terminal of the LED first, since this means that the LED can be soldered in place and then adjusted before finally soldering the terminal of the anvil chip holder. This greatly reduces the risk of heat damage to the LED. (That's a good general LED tip by the way)
The "inductors" are actually used as links with the coil wound round a suitable former like a 5mm drill shank. You could use plain wire links, but shaping them like inductors gives a more technical look to the unit. The flip flop circuit is a generic textbook type of circuit and can use almost any general purpose NPN transistors. In the UK you could use BC547/8/9 type transistors and if an alternative is chosen with a different pinout then the pins can be re-arranged to match the emitter / collector markings on the layout drawing. The two electrolytic capacitors should be inserted with their negative terminals facing towards each other as shown on both the layout and the copper tracks. The battery holders are PCB mounting AAA holders with the choice of AAA batteries being forced by the space available.
If you use ultra high output LED's or simply want either a dimmer unit or longer battery life, then you can change the value of the two 10R (10 Ohm) resistors. Increasing the value to 22R will half the power consumption. The original case was a generic playing card case, but the design has been made slimmer and various cropping guides are printed on the copper layout to assist in adjusting the board size to match different cases. A nice case is the type that comes with the cheap laser pointers. This has a black base and a clear lid.
If you want to make one of these devices then you will find the PCB layout and foil below in TIF format. If you view the images directly they will look a bit ragged at the edges. This is because they have been scanned from a laser printed original, but when they are printed at 300DPI the image will be fine. I chose TIF because it seems to carry information that results in printing being done at the correct size. If you don't have the ability to read the TIF format on your computer then you might take a look at the Irfanview website where you can download a freeware file viewing utility.
I've added a small section of half inch scale to the file to allow you to validate that your printer is producing output of the correct size.
Click here for the track and layout of this PCB in TIF format