HACK YOUR SOLAR GARDEN LIGHTS.
Solar garden lights.... How on earth do they manage to sell something with a solar panel, rechargeable battery, step-up converter, LED and the plastic and metal casing for a dollar/pound. You can't even buy the bare components for anywhere near that, in fact the solar panel alone would probably cost you five times the cost of the whole light!
This project is about hacking your solar lights to make them different colours and potentially increasing the battery life too.
Solar lights are great to hack. They're cheap enough not to worry if you mess up, and very gratifying because they are effectively free to run due to being powered by sunlight.
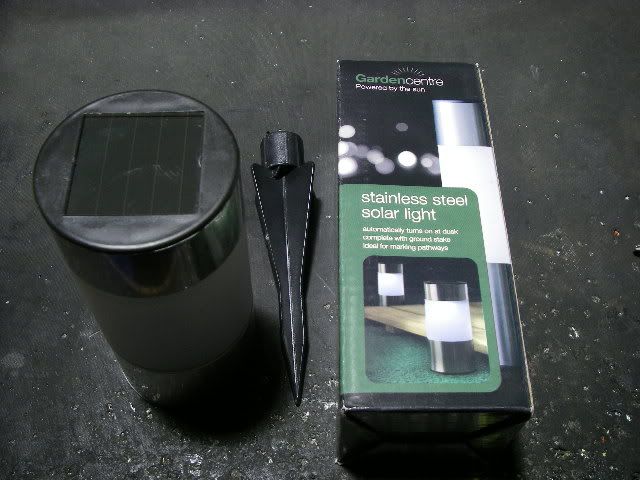
Here's the test subject for this project. A solar pillar light from a UK shop called Poundland (A British dollar store).
Before starting, turn the light on with the little switch usually mounted next to the LED, and cover the solar panel to check that it lights up. If it doesn't then it may need to be left turned on and stood in sunlight for a while to get a bit of a charge.

Inside is a small NiMh cell and a PCB with the LED, a small inductor, a switch and a COB (Chip On Board) which is basically a bare integrated circuit which is stuck to the board, connected and then covered with a blob of black resin.
Some of these lights use a four pin package version of this chip instead of the blob version. These chips are very ingenious. They contain a diode for charging the single NiMh cell from the solar panel, but also use the voltage from the solar panel to detect when it's dark enough to turn the light on. The circuit pulses a small inductor at about 100kHz to step up the voltage to drive the LED in a similar style to a Joule Thief circuit.
The use of a single NiMh rechargeable cell keeps the cost down, means the solar panel is a cheaper lower voltage version and by the nature of being just a single cell instead of several in series, the battery can't be damaged by reverse charging from other series cells every night when it runs out of charge.
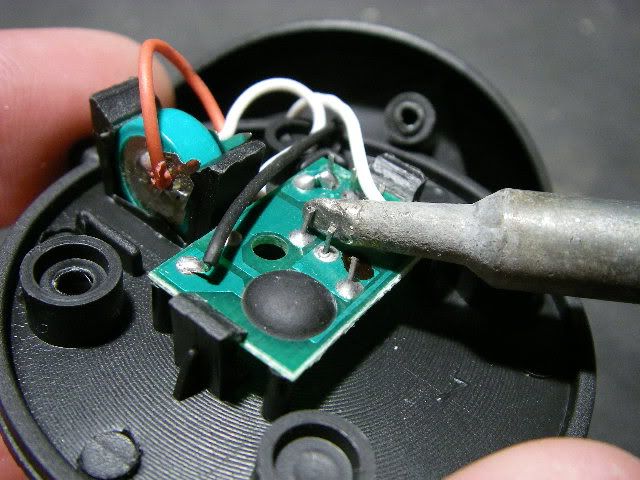
After noting the LED polarity, (the negative side of the LED is usually the one with the anvil shaped reflector) you can easily desolder the existing white LED by pulling it while heating both it's solder pads with a soldering iron.
I've made a red dot on the PCB at the positive side of the LED for reference.

If the LED pads have solder left across the holes then it can be removed with a bit of desoldering braid, which is a fine braided copper wire soaked in resin. It sucks up solder when heated and leaves a clean pad.

Now put in your new LED noting the polarity (long lead is positive). Use a modern high intensity LED. Plain old fashioned indicator LEDs will loook very dull.
I used a high output diffused LED to spread the light about in all directions.

Solder just one of the leads at first so you can adjust the LED before soldering the other one.

And test by turning the light on and covering the solar cell. If it doesn't light up then it may be that the LED has been inserted the wrong way round. If you can't get it to light then try desoldering it and putting it in the other way round.

But why stop with just one LED. While playing about I noticed that when two are wired in series they are just about as bright as a single LED, but the circuit draws less current. More importantly, you can mix colours!
To join two LEDs in series you need to join ones negative lead to the others positive lead. I've marked the positive leads with red marker to make it clearer.
Start by folding one LEDs positive lead sideways and the others negative lead sideways as shown.

Hold the two LEDs side by side and solder the wires together.

Then trim the excess.

And shape the leads to go into the holes in the solar lights PCB.

Solder in with just a single lead first, align them and solder the second, then test.

I decided to do a side by side comparison of one versus two LEDs. I've noted the battery current draw of each arrangement on the test sheet.

And when lit there is very little intensity difference, but the lower battery current will result in more than 25% more run time.

Now for some colour mixing. Red and blue gives a purple colour while blue and green gives a turquoise colour. You could even use a colour and white in series to make pastel colours.

Four combinations on test as noted. The camera is very sensitive to green light so they appear to swamp the other colours. However, they appear a similar intensity when viewed by eye.